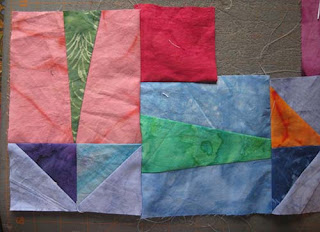
Last week I showed a quilt I made with arrows along the top, and down the right border.
That post includes a detailed arrow-making tutorial. I had so much fun with the arrows that I made lots of extras. I set eight extras into blocks of four:
Eureka, it's a mini recycling quilt! I also discovered that the arrow tips can line up with the central red square, as in the block above; or not, as in the block below:
Can you see the difference in the alignment? Here are the two blocks snugged up together.
With 8 more arrows, you could wind up with a fine frenzy:
I didn't do a lot of
measuring with my first arrows, but quickly discovered that if I wanted them to chase each other in blocks of four, I had to measure. (The first part of the tutorial below repeats some of the pictures from my last tutorial, but with specific measurements.)
1. Cut the arrow tips
from 3 1/4" squares cut diagonally in half. You'll need a background color (mine is
lavender), plus two tip colors (Polka dots and turquoise fabric in the upper arrowhead, navy and orange for the bottom arrowhead).
Join each tip triangle to a background triangle. Then join two of those units together, side by side. Stitch four pairs.
Join each tip triangle to a background triangle. Then join two of those units together, side by side. Stitch four pairs.
2. For the shaft, start
with strips that start out 3" x 6". Each shaft needs 2 colors (one for the
shaft itself - green in the image below - and another for the background - rose in the image below.)
3. Stitch the three pieces together at the angles of your choice, as described in detail here in last week's tutorial. Cut the shaft unit down to a square that is 5" x 5". (or the width of your tip unit x itself.)
4. Join the tip and shaft pieces.
3. Stitch the three pieces together at the angles of your choice, as described in detail here in last week's tutorial. Cut the shaft unit down to a square that is 5" x 5". (or the width of your tip unit x itself.)
4. Join the tip and shaft pieces.
5. Trim the shaft edges so they line up with the tip edges. Each finished arrow should be 5" wide x about 7 3/4" long.
6. Place the four arrows in position, pointing clockwise or counterclockwise. Cut a middle square to 2 3/4" x 2 3/4". (It's red in my example).
7. Fold the middle square down, right sides together, along the top left corner of the bottom horizontal arrow.
7. Fold the middle square down, right sides together, along the top left corner of the bottom horizontal arrow.
8. Stitch most of
the way across the top of the center piece, but not all the way.
9. Open the central square. It will look like this, with only a
part of the red square's lower seam sewn. Place the next arrow in position, to the left of your unit.
10. Flip the left arrow on top
of the red square and the arrow below it.
6. Stitch ALL THE WAY down the left vertical seam.
7. Open the second arrow now that it's
all sewn.
8. Align the third arrow - that's
the piece along the top.
9. Flip the third arrow down, right sides together, with the arrow and red square below it, and stitch in position.
10. Align the fourth arrow, on the right. Flip it right sides together onto the arrow and the central square next to it. Stitch all the way down to the loose
lower right hand corner of the central square.
11. The only unsewn seam is the one
on the lower right of the red square. Flip the red square and the upper
right arrow downwards, on top of the lower horizontal arrow. Pin the right sides together.
Begin stitching an inch or so before the existing line of stitching ends,
overlap those first stitches, then continue stitching all way out to the end. Here's the finished block, again.
Of course you can play around with this idea by aligning the arrow tips with the central square, and varying hues and values, making long chains of arrows for borders, and much, much more! Maybe something for Valentine's Day? Arrows to the heart? Circular targets? Bows and arrows? Whatever you do, have fun with them! Send pictures!


No comments:
Post a Comment
Thank you for commenting!