Sunday, July 23, 2017

Mug Rug: Ugh? Or Luv?

Mug rug. Ugh. The name reeks of cute. In the quilt world, a mug rug is a mini-quilt upon which one places a cup and a small nosh, maybe a nice piece of pastry. When someone first explained the concept to me a couple of years ago, I thought it was the silliest idea ever. What's next, Carrot Carpets? Munchie Mats? Fondue Flooring? Borscht Blankets? Toothbrush Tapestries?

And if you image-search mug rugs, speaking of toothbrushes, you'll need to use yours - the results are even sweeter than the potential pastries. A lot of mug rugs out there are decorated with snowmen, mittens, hearts, and flowers - all of which I'm cool with, in small doses.

That's the downside of mug rugs. But despite my prejudice, I deliberately put myself in a position where I had to make one. Because I knew it would be a great way to trick myself. 

One of the hardest things for quilters is to get out of our own way. With every new project, we aspire to make something that's merely better than anything we've ever made, or even seen. That attitude spells creative doom.

So I tell myself I'm just practicing, on something insignificant. Then, anything I do will wildly exceed my expectations!

And therein also lies the  conceptual greatness of potholdersArtist Trading Cardsfiber postcardsinchies, twinchies, betwinchies, and come to think of it, bed quilts - women aspiring to make bedcovers sometimes create museum pieces. Like the Gee's Bend quilts - I rest my case.

Will museums show mug rugs one day? That would have sounded crazy to me,  until I received Esther's.

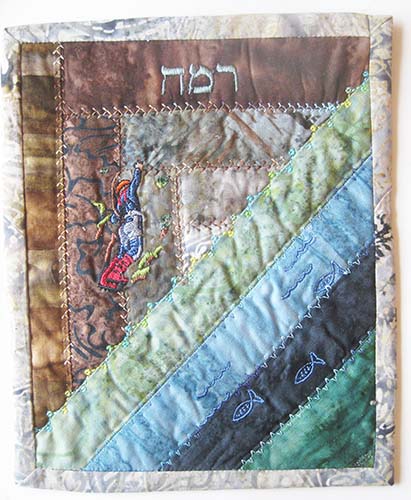
When I signed up for  my very first mug rug exchange, I was lucky enough to be assigned to receive one from quilter Esther Bartels of Massachusetts. The theme of our swap was "Climb Every Mountain," and Esther made me this amazing piece in batik earthtones, with an embroidered rock climber, fish in a stream, and the Hebrew word  "ramah," for "heights," on top. 
I'm sorry, Esther, but this is no mug rug.  I would NEVER allow a buttery croissant  or a sloshy cup-o-joe anywhere near it. It's a beautiful little art quilt. Thank you!

For this swap, I only had to make two, but I had a special event coming up, and needed gifts. I was also in the midst of my English Paper Piecing (EPP) and handstitching obsession. So I made a pile of 3" cardstock hexagons, and used them to cut hexagons from a bunch of whimsical red, white and black prints. I ended up making a half-dozen mug rugs.  And they turned out....well, darnit, cute. I can never scowl at a sweet mug rug again. 


I hand-stitched the hexagons together, which doesn't take as long as you'd think. Here's the back of one of the hand-stitched tops, with the cardstock still inside. 

The more I made, of course, the more I began to enjoy them. Even handstitched, they are fast gifts. For some, I machine appliqued the tops to a red felt backing, with nothing in-between. The first step was to remove the cardstock templates, then pin the top to felt.  
Straight stitch all the way around the circumference. (I used invisible thread.)
The back:
Cut away the excess, an eighth of an inch beyond the stitching.
So fast! Optional: Machine (or hand) stitch around the central hexagon. 
The alternative way to finish them - with a quilt batting in the middle, and then a turned edge on the backing - is more time consuming. 

Ph.D.s in mugrugology dispute how big one should be. I've seen sizes ranging from 4" to 8" on a side, up to a foot! Usually they're rectangles, sometimes squares, circles, hexagons, even octagons. Bigger than a coaster, smaller than a potholder or placemat, is how I now think of them. 

After viewing the diversity of mugrug shapes online, I realized I had numerous potential mug rugs. not to mention toothbrush tapestries, lying around my house - specifically, in my UFO and orphan blocks department. Like these recent leftover EPP blocks from a quilt project:

Hey, I could just finish their backs, declare them mug rugs, and move them out of my house! But that begs the deeper question: Do our friends who haven't enrolled in a swap really want mug rugs? Will they use them? Do their neighbors and relatives drop in all the time for tea/coffee/hot cocoa/miso soup, like on TV sitcoms? Mine don't. Basically: Shouldn't we just declare them art and encourage our friends to hang them up instead of laying a trip on them that they should start making cocoa and brownies for non-existent hordes of mitten-clad sweet-toothed visitors? (Also: If the neighbors do drop in, and you put your home-baked goodies upon the rugs, how are you going to wash the oil and butter and coffee stains out of these things?) 

While doing my 13 minutes of research for this blog post, with my newfound love of the artform, I saw many fun, artistic, and interesting mug rugs.
  •  I like the scrappy pieces on this page, especially the one made from selvages.
  • An Etsy artisan makes beautiful, artistic mats that look like leaves. They're sold for a ridiculously modest price. Find them here.  Save time, buy them and support her/him! (No affiliation!)
  • Want to learn foundation paper piecing? Do it while having fun making these sincerely adorable octagonal mug rugs here.
Have you made mug rugs? Would you want some? Would you use them?

Sunday, July 9, 2017

Fidget Spin a Kid-Pleasing Quilt or Pouch

Here's a pop culture test. Does this remind you of anything?

Until a month ago I would have said it's some kind of stylized chimpanzee face. Here's another clue:

One short month ago, I would have had no idea. In those days, I had nothing to do with my hands but make quilts, eat and fling them in the air when startled.

Then I learned about fidget spinners. Specifically, I read an article online about they've taken over the world. I had no idea what the article was talking about, and didn't bother to google it.

Then I was in line at Michaels, and saw a bunch of them on display, each decorated differently. I deduced that those must be what that article was about.

Then my DH and I stood in the cashier's line at our supermarket, where we go every week. On that day, a bunch of fidget spinners with superhero themes were hanging by the chewing gum. On impulse I threw one on top of our groceries.

(I chose the Superman theme, because they didn't have Wonder Woman.)  

At home I ripped open the package, and spun it. With just one flick, it spun for a remarkably long time, but I still didn't get it.

But I stuck with it. It became fascinating to spin it and gently roll it around, feeling the gentle push and pull of angular momentum.

Plus has a cool, undulating design. It reminded me of the Weight Watchers ice cream sticks that inspired freemotion quilting designs; and also of Cheryl Lynch's stylish Curvalicious (TM) ruler, which helped me make two graphic quilts.

So yesterday morning, after thinking about this for a while, I tried tracing my FS. Guess what happened? The flippin' thing MOVES when you trace it, no matter how hard you hold it with the other hand. It was hilarious.
My tracing:
 Tracing through the small holes is equally impossible...
I decided to draft my own idealized version, using inert objects in my sewing room. First, I traced part of my plastic equilateral triangle template to create a 2 1/4" more-or-less equilateral triangle.
Then I dug out an empty spool. Peeled away paper label on the ends that occluded the view. Peered through the center to place and trace a circle on each angle.
 First circle:
 All three.
 Use the same spool to generate the curved lines connecting the circles.
 All three. (Looks like a moon over the mountain block, no?)
Locate a smallish circle  I searched my pockets for change, but there was nuthin. I located a bobbin, and traced that. (It still has invisible thread in it.)
Now let's compare - my drafted idealized vision on the left, with my inaccurate, yet folksy tracing on the right. Which would you use in a stitching project?
Both have their charms, but I decided to go with my drafted version. I traced the spool, bobbin, and overall drawing onto the back of paper-backed fusible web (right).
Then I fused the web shapes - three small circles, three large circles, and the overall shape - onto three solid fabrics. I was torn between keeping these larger circles....
...And leaving them out, which was simpler and kind of sweet in its own way.
Astonishing discovery: With paper on the fusible web backing, you can literally spin these fabric versions on a flat surface, with a flick of your finger! They don't spin as eagerly as the real deal, though.

I wound up making two of them that spun nicely.
Wouldn't a whole bunch of these be a great quilt?  

Instead, I made a little pouch to keep my precious. My FS measures 3" at its widest. I cut the navy background fabric to 4 3/4" x 11 3/4". The idea is to fold the strip into a pouch with a flap. Here's the schematic of what goes where on the long raw edge rectangle of outer, featured fabric. 
It's a good idea to satin stitch these motifs down before you add the lining. (I didn't, but I should have, so let's pretend I did.) 
Put the featured side and the lining right-sides together, and stitch around all four sides leaving a 2" gap along the short edge that's furthest from the two appliques. 
Turn it right side out. Fold the bottom edge upward and stitch down both sides of it (I did these two lines of stitching from the wrong side). Then fold the top flap down. 
 Front with flap up.
 Back view.
Finally, you must look deep in your soul and ask: Buttons, or no buttons? If you're making this for a kid, you might want to ask them (or their parents) Some children are anti-embellishment. 

Since I was making it for me, I went for broke. Here's the new front, with buttons. 
If you use the same sealing method as I did, the front of your pouch will need at least one button, on the bottom arm: 
That's a piece of purple elastic stitched to the underside of the flap, to hold the pouch shut. On the back I went a little crazier, with three silver-grey buttons, and a strange red button with a cross in the middle. 
And that's my fidget spinner story! If you have a fidget-spinner-fan in your life, please run with this idea! I'd love to see your fantasy fabric fidget-spinner!

PS Never give a fidget spinner to a child under 3. There have been problems, even with older kids. http://www.goodhousekeeping.com/life/parenting/news/a44415/moms-share-scary-fidget-spinner-injuries/. 

Sunday, July 2, 2017

Stitching and Gluing for a Steampunk Wedding: Agony, Followed by Ecstasy

When I first heard that the daughter of a dear friend, Caitlin, and her wonderful fiancé Nathan were having a steampunk/time travel wedding, I was taken aback and began kvetching loudly to no one.

First, because the wedding was in April. Aren't costume weddings for Halloween?

Second, who ever heard of a costume wedding?

Third and the real problem: What would I wear? I have enough trouble shopping for acceptable contemporary attire, let alone swathing myself convincingly in garments of the past.

But then I recognized this invitation for what it was: A stitching/crafting/destashing opportunity. Specifically, to use up my teensy pile of rusted watch gears that I'd purchased years before, when Steampunk first became a thing. I'd paid $10 for maybe a half-gram of old watch parts like this.
My DH is also costume-challenged. It came to me that if I made us couple of Steampunk brooches, they could serve as 98% of our costumes. I mean, we'd go fully dressed in SOMETHING, but the brooches would automatically make us Time Lords (That's a Dr. Who thing.)

I also wanted to give the happy couple something beyond the check. They are such nice people that they would probably thank us sincerely if we gave them yak manure for their garden (if they had a garden). But time travel is such a great theme. Surely I could whip up something from my fabric stash, much of which has travelled over a very long time and distance to reach my house.

I went through my UFO pile and dug up this denim and lace composition, that I'd agonized over last year.
A tutorial for laying down the denim background and auditioning embellishments is in an earlier blog post.  In the last paragraph I grumbled that I didn't know what to do with it.

But now its destiny was clear! Everything on it was vintage: the jeans, the mother-of-pearl  buttons (and some made of ye olde plastick); the intense lace, especially those corner cut-out squares, which make me swoon!
(What were these lace pieces originally intended for? Collars?) Come to think of it,  I convinced myself, the piece was old, new, borrowed and blue - perfect for a wedding gift. 

I felt it needed something more - everything does - so I tried scattering my pile of rusty watch gears over it, but the result wasn't great, and what the heck would people do with a textile that had rusty old things glued to it?  (Don't answer that.)

I dug out my last fragment of a wonderful millenium print fabric, bought in the year 2000, with clocks printed all over it. I cut up some clocks and lined them up in the border. Not bad! I appliquéd them in place with (very modern) invisible thread. 
A little closer: 
A lot closer: 
So easy! So fun! Better present than yak manure! And it ended too soon! But by now my Steampunk pneumatic cylinders were churning. I dug out a circular and and an oval wooden shape, glued batting on top, and covered them with  plaid silk from an old upholstery sample book. I then glued my overpriced watch parts on top. I sprinkled on some buttons, keys and a cool old toy compass for good measure. Glued pins to the back. (Detailed tutorial, see below.) Here's brooch #1, which I wore to the wedding....
And here's #2, which I only took a really bad picture of (sorry), which my husband wore: 
As the wedding wound down, we pinned this one to our gift, as an additional present.  

Along with the brooch, I wore my mother's 1980s-era fringed white cowboy shirt. Thus I was a time travelling steampunk cowperson who was also my own mother (That happens a lot with time travel). My DH wore the other brooch, my mother's trench coat, my Dad's Irish tweed cap, and my daughter's large red bowtie (leftover from her Halloween stint as Dr. Who). He did look Whovian. 

The wedding was an absolute delight.  Any doubts I had about the idea of a costume wedding vanished the moment I set eyes on the bride and groom.
Are they not gorgeous? And it was soooo much fun to see the guests dressed creatively. Some eras were particularly popular. There were a half-dozen Starfleet officers, include the bride's tiny 93-year-old grandmother sporting realistic Vulcan ears, along with her Federation uniform.  She's an interplanetary firecraker! 
The mother of the bride, and several other women wore flapper costumes that they'd cleverly bought on AMAZON! I wish someone had told me that costuming could be so easy! Here's mother and daughter: 
There were gears hanging from the ceilings and strewn on the tables, along with pages from old books. In short, it was waaaay too much fun! Thank you for inviting us, Nathan and Caitlin, and mazel tov to you both! 

Want to make your own Steampunk time traveller's brooch? Start by rounding up all your metal things, ideally old, broken,  and rusty....Don't neglect bobbins. If you don't have vintage embellishments, you can buy fake vintage at the craft store. Here are three small Steampunk-themed wallhangings I made years ago for an online craft swap.
Yes, that's a sewing machine light bulb, a broken bobbin, and some fake gears from Michaels....
A bow made from metal screening....
...A nest made from wire and a fake pearl....and whatnot.

Create a wearable backing. For the wedding, I used wooden shapes, but cardstock, fusible interfacing, or even faux leather or Kraft Tex(TM)  can work.  Cover with batting, and then interesting fabric cut larger than the shape, with edges pulled and glued to the back. Next....

1. Trace around the entire shape onto a piece of faux leather, real leather, or felt....(I really really should have done this before gluing the stuff on it). 
2. Cut out the shape....
 3. Plan the pin location, then mark where the sticky-outie parts are....
 4. Use an xacto knife to cut slits....
 5. Pray while pushing the tip of the pin and then the critical parts through....(sometimes it takes a couple of circles and cuts to get it right)....
 6. Smear glue liberally. Be more frugal as you reach the outer rim.
 Smack that thing on the back!
Let it dry and add glue as needed. Now you are a potential Time Lord, so have fun with your inter dimensional travels!