Saturday, October 21, 2017

Ten Minute Ugly Necktie Halloween Monster!

Meet my new best friend/Halloween decor!

He's made out of scary neckties! He's low-sew or no-sew (glue works, too!) The label that serves as his mouth reveals the source of the blue tie: Sears/The Men's Store, I'm guessing  circa 1968.  The red tie is strewn with San Francisco cable cars! Both ties are so bad, they're great!

He's posing with HIS new best friend, a crocheted pumpkin of yore. Unlike the crochet, he is so fast  and so undoable! If ultra-wide, terrifying neckties ever come back into fashion, it's very easy to take him apart, and wind up with two intact separate neckties! (Unless you used glue.)

Can you stand it? Let's begin!

1. Obtain two horrible, wide, neckties. Use a seam ripper to carefully remove the label from at least one if you will be using it as a mouth (or other feature.)

2. Starting is the hard part. Fold the left necktie (blue) over on top of itself as shown. Place the right necktie (red) underneath it, and bring the short end down on top of the folded blue tie.
Arrange the short/narrow ends like this:
 Pull the long end of the red tie over its short end...
 ...Smush that red tie into the blue hole, and pull up a loop of red tie.
Now pull the long end of the blue tie to the right, make a loop, and insert it in the red loop. Pull the loop of blue tie out, and adjust as needed so the front of the tie faces outward.
 Bring the red tie up and pull through another loop, and adjust so front of it shows...
...and bring a blue loop through the red loop. Keep alternating until you're almost out of necktie ends. You want enough leftover to serve as arms, plus a nice generous head. (Unless you prefer the Doc Ock look with long arms and a tiny head, like this:)
Below are the proportions that worked out on my first try. I took it out and redid it a few times - the proportions of head/arms/legs changed with each try!
Once you like it, you could leave him without any facial features, for a kind of Amish look. Or sew on two buttons for eyes. Embellish more!  Go wild! I used the label as a mouth, but a label could also serve as a monobrow, or maybe even hair!
Something else I could have done was to sew up the sides of the head leaving a small gap, and stuff it. That would round off the head.

On the red tie, I left the label in its original position, on the leg.

I love old necktie labels - the vintage typeface, the graphics. Is this store still in San Francisco? I googled it, but could only find Jethro Tull, whose members would never have worn this tie.
I had so much fun with doll #1` that I pulled out two even WORSE neckties from my stash, and made this: 
The top of the label says "A Wemlon Fabric." Here's a more readable view:
Have you ever heard of Wemlon? Me neither, so I googled it. Turns out to be a euphemism for polyester. Many vintage Wembley ties can be purchased online. On bottom, there's what appears to be garment selection advice: "For brown, olive, or blacks." At least I hope it's garment advice, and not complexion-based advice.

I hung  from a fence pole, with a string through his head. Gravity gave him kitty ears.
I like the tie ends flapping in the breeze! Perfect for Halloween! Have fun with this idea! If you don't have enough ugly neckties - take heart - plenty of vintage Wemlon ties are sold online. 

P.S. From my archives, more ultra-fast low-to-no-sew fabric Halloween decor - wrapped fabric pumpkins - are here.
(Why, you may ask, do I have so many hideous neckties in my stash? They're leftover from my comprehensive history-of-neckties quilt!)


Sunday, October 15, 2017

From Russia, With Guilt: PutinCrafts

I feel guilty.  I must confess. I made a Putin tote bag.

The back features Rasputin, and a matroyshka doll pocket.

Then, as penance, I made a Putin pincushion.

[UPDATE: It's just been pointed out to me that, with the pins, he looks like actor Ray Walston as...
 ...My Favorite Martian! Except MFM was a sweet guy. Image courtesy Wikipedia.]

How did I come to make crafts featuring a murderous and corrupt dictator who messed with the American elections by fomenting hatred on social media?

Well, in my weak defense, I ordered the fabric in December of 2016, when Russian involvement in the US election wasn't known. At the time, I was also experiencing disorientation from empty nest syndrome -  my youngest had just started college on the opposite coast.

Said freshman had surprised us by enrolling in a Russian language class, while writing a mystery novel set in Russia! So suddenly our whole family was thinking and talking a lot about Russia!

Although I've never been there, I've always thought of Russia as a country with many charms, including fascinating and brilliant people, matroyshka dolls, St. Petersburg,  chess players, scientists, The Brothers Karamazov, the Bolshoi, and treatment of my direct ancestors in ways that ranged from wonderful (forestry job for a great-grandfather, a medal from a Tsar to my great-great-grandfather), to the murderous (pogroms).

So in learning Russian, my daughter was returning to distant family roots. Even my Poland-born mother studied Russian in grade school; aforementioned great-great-grandfather was fluent, which did a lot to further his illustrious rabbinical career.

Thus, in December, when the custom printer Spoonflower (no financial affiliation!) offered a two-for-one fat-quarter sale, I had Russia on my mind, and my daughter was home for the break. We  decided to make her an ironic Russian-themed tote bag. She approved the fabrics. I bought the following four for the price of two (which came out to a little over $5 each! Such a deal!)

First, delightful matroyshka doll fabric by Scottish designer Kelly Legg of Floramoon Designs. The word means "doll". Find it on Spoonflower here.  
Second, this ultra-creepy "Putin Mirror Image" fabric, here.
Then we picked a fabric with Putin heads showing her/him as a woman, called "Putina on white dots," by Susanna Haestad, a Norwegian designer, sold here. Is this fabric sexist? Does it pose an interesting question: What if Putin had been born a woman? Arguably!
And speaking of awful people, for the fourth fabric, my daughter approved "Rasputin frames," by Peter Krueger, sold here
The four FQs sat for quite a while - 9 months. As the election investigation deepened, as I learned more about how the Russian leader operates, the idea of a tote bag about him seemed to be in worse and worse taste.  But then my DD's birthday approached, and she assured me she still wanted it. So I made it.  On her, he looks good.
I had a little fabric leftover, and of course began brainstorming what I could do with it. Putin is not cuddly, so no Putin pillow. But how about a Putin pincushion? This fabric has fascinating mirror images that surround each figure. So I started with this scrap: 
 Folded it good sides together:
Stitched around the three sides, leaving a turning gap on the right. Turned it right side out and started stuffing.

I tried to distribute the stuffing so more of it backed the figure, and less the background.

Next, I stitched up the hole with a needle and white thread. Seized an embroidery needle and red floss. Did a line of straight stitching along the figure on the front....
 ...and, at the same time, the figure on the back, which lined up pretty well...
Then I decided to fill the background with cross stitches and pseudo-cross stitches, necessary to cross stitch both sides at the same time.

 The reverse in progress:
And before long, it was done, front...
...and back...
That's blood on his hands
Now it occurs to me that someone who admires Putin might consider this a complement. Maybe the X's look like kisses? Maybe it looks like interesting thought balloons are coming out of his KGB-trained head?
OK, to totally assuage my guilt, I just made a donation to the Reporters Committee for Freedom of the Press, and I urge you to do the same, whether you make accessories out of Putin fabric or not.

My tutorial for making a bundle-able bag out of any kind of fabric, tasteful or not, is outlined here.

UPDATE: By the way, Spoonflower fabrics can also be ordered as gift wrap. Can you imagine wrapping a present in the Putin or Rasputin fabrics above? 


Sunday, October 8, 2017

A Pieced Prayer Scarf by Any Other Name (Quilt, Tallit, Stole) is Just As Sweet

I've made many Jewish prayer shawls (aka tallit) during my time as a quilter. Prayer shawls are usually what quilters would classify as applique projects: Stitch a design to the front (or not), decide whether you want a lining, a collar rectangle, stripes, or corner squares, and you're almost done. (Few people want batting). They can be as simple as one  piece of fabric (like the spectacular hand-painted fabric below, made by quilter Ricky Tims, modelled by my DH, with my Mom looking on:)

...to a simple background white background with the stripe and lining fabric selected by the client:

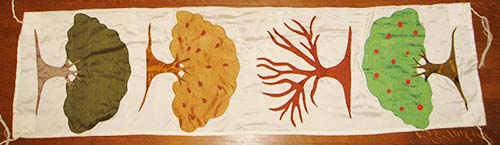
...to a more intricate cutout - this one's made from six shades of hand-dyed cotton....

...and this one's in dupioni silk...

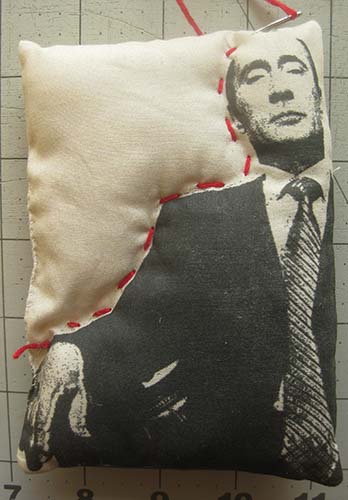
...to something really complex involving photographs and piecing, like this tallit for my son, with NASA space photography...
...and this one for another young man, a Beatles and rock guitarist, modeled by my DD...
....guitar photos served as stripes. (The whole story).
Once you've done the appliqueing/piecing/stitching, all that remains is tying a fringe - called tzittzit- in the corners.

I've made so many tallitot (the plural), that you can imagine how excited I was to get an assignment from a different religion!

My friend Marian Sunabe attends the historic Evergreen Baptist Church in Los Angeles, founded by the  Japanese-American community in 1925. After the attack on Pearl Harbor, a notice of eviction was posted by the government on the church's door - and many of their members were shipped to internment camps in remote, harsh locations. Sensitivity to this shameful episode made this church outspoken during the Civil Rights era and to this day, as it serves a diverse Asian-American community.

A happy occasion was coming up this summer: installation of their new pastor Jason, a delightful person, who is also one of my Artist Trading Card swap partners. (He made me a lovely woodburned tree ATC a couple of years ago, here.)

Marian asked me if I would help her make what she called a "stole" - a word I always associated with last-century mink neck wraps worn by my elderly relatives! But as it turned out, a stole is just a variation of a tallit!

The downside was that they needed it soon, I was about to go on vacation. I would be returning home on Friday, and the installation was Sunday. Marian was rightfully anxious, but I wasn't - barring flight delays, and with a little preparation, I knew that we could churn it out in an afternoon.

Jason wanted historic photos on his tallit, er, stole, and I was out of pretreated photo fabric sheets (my favorites are favorite EQ Printables Cotton Satin sheets), so I asked Marian to buy a bunch. I was expecting her to come back with a pack of flat sheets, but she bought this:
It's an 8.5" x 100" roll of Blumenthal Crafter's Images PhotoFabric, cotton poplin. It runs about $25. I'd never used this product, but it worked out very well. You have to cut the 120" roll down to the size you need - in this case, 8.5" x 11" sheets to feed into the printer.

The stole would need to be 92" long - far longer than my longest tallit (they usually run about 70") - and merely 5" wide - way narrower than any tallit I'd ever made. So I sized the photos to 4.75" square (to fit two on a page), and printed them onto the fabric sheets. Here are some of the historic images Jason wanted on the scarf. First, the civil order removing Japanese Americans from their homes.
Next, a harrowing image of the Japanese community lining up for trains to the camps, an image which resonates so deeply with me as the daughter of a Holocaust survivor, 
This picture of Sunday School at an internment camp,
 The American flag flying high over the Manzanar camp, an iconic Federal government photo:
 A Christmas image from an internment camp:
Having lived in Tokyo, I've always felt the Japanese and the Jews had a great deal in common - but this project, and specifically the photos - really brought home how much, in America, a history of discrimination unites us.

I arranged the photos two to a page in my graphic design program (CorelDraw, but you could do it in Word), and then printed them out onto the Blumenthal sheets, before I left on vacation. Marian also brought over a stack of  glorious Japanese fabrics - most from vintage kimono - that one of the congregants donated to the project. OMG I was in love. We made a tentative plan.
The trip went fine, we returned Friday night, and Saturday afternoon we set to work. We had already cut one piece of grey/blue kimono fabric to serve as the lining - 93" x 5 1/2". We lay that on the floor as our template. Then we arranged the images and fabric strips on top of it. Marian is a gifted artist with an incredible eye - her medium of choice is usually collage, paint and paper - so I put her in charge of deciding which fabrics to use where. She was the art director, I was the technical consultant.


Marian came up with the color scheme, dark navy with shots of burgundy-reddish-purple - so elegant in subdued, spectacular Japanese prints and wovens.

It probably took us about 4 hours. Once the top strip was stitched together, we pinned it right sides  together against the backing, sewed all the way around with a quarter-inch seam allowance, leaving a turning hole of 5" along one edge.

Then we turned the whole thing to the right side, pressed it, and did a topstitch all the way around the edges. The sun was still up when Marian modeled the results. 
She sent me pictures from the installation ceremony the next day: 
What could be sweeter?
Joy-wise, it's not a whit different from what I see in bar and bat mitzvah pictures, when children are presented with their prayer shawls, we all think deeply about tradition and history....


   Good heavens, I love my life!